Wednesday, February 29, 2012

How-To: Simple Everyday Makeup

Hola amigos!

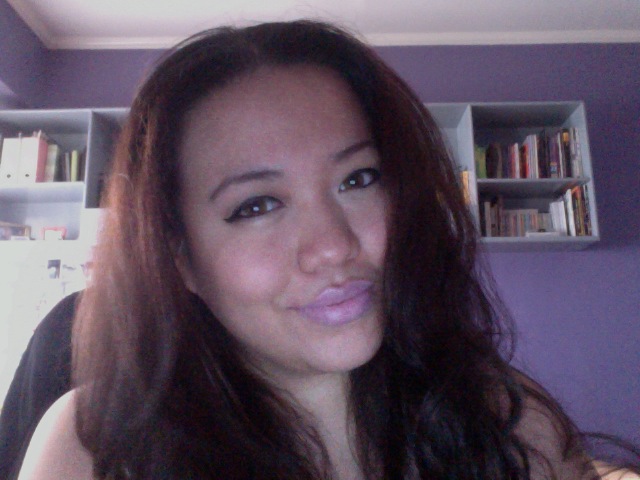
Do you remember my last post when I reviewed the makeup brushes I got from E.L.F and Marionnaud? If you do, do you remember that look that I posted and described as my go-to look as of late? Well, if you don't, here's a reminder:


I actually wore this look again today since I've grown so fond of it. It doesn't take much time either. If you want to recreate a look similar to this or copy this look, here's a quick little tutorial/how-to of the look. 

Here we go!

The very first thing I do before I put on makeup is I wash my face and I moisturize (even if I've already done this in the morning when I wake up). I've always believed that everyone should moisturize, whether you have dry skin, oily skin or a little of both. This is especially true when you're going to put makeup on. I use the Clinique Dramatically Different Moisturizing Gel. 

I got this as a part of my three step skincare set from Clinique for Php5,000.  I'm not quite sure how much it costs on its own, but I'm guesstimating it to be somewhere in between Php1,500 - Php2,000. Definitely get the set if you need a good skincare set if you want to save money. The bottles of face wash, toner and moisturizer you get are humongous. 


If you have dry skin, it keeps your skin hydrated as makeup really can suffocate your skin. If you have oily skin, like me, moisturizer helps to keep your face from getting even oilier. Your skin naturally produces oil after you wash your face, so the moisturizer ensures that your skin doesn't produce excess oil. 


After topping the moisturizer off with an oil-controlling primer, I use the Dr. Oil Solution Shine Free Dual Primer), I take a foundation brush to apply a light layer of foundation or tinted moisturizer.  

Dr. Oil Solution Shine Free Dual Primer (Php498) from Etude House

Lancome Teint Renergie Lift R.A.R.E. (Php2,395).

Recently, I've taken a renewed liking to my Lancome Teint Renergie Lift R.A.R.E., so I've been using that more often. For my skin color, I use the O-04. You have to work relatively fast with this product as it tends to set quickly.


Then after that I typically give my face a quick brush of some loose powder just to make sure that I'm not shiny in places it's not appealing to be shiny (for example around my nose or on my forehead). 

Shu Uemura Face Powder Sheer. It was a gift from my mom, but I'll drop by Shu Uemura soon to get the retail price here since it's not available online. 
The powder I've been using since the beginning of time is the Shu Uemura Face Powder Sheer in 7YR light. It's a fantastic powder to use for a soft, matte finish. On a completely different note, I love the way Shu Uemura powder smells. Some people say it doesn't smell like anything, but I just adore it. Maybe I'm just livin' la vida loca when it comes to Shu Uemura powder.


I tend to go in with a little MAC concealer (check out the kind of concealer I use here) under my eyes or wherever I need it after the powder. I haven't been sleeping well recently because there's so much work to do so I'm getting really bad dark circles. If you have dark circles under your eyes that are have a gray or blueish tint, you can use a peach tinted concealer to counteract the discoloration. Just make sure you put that on before you go in with your foundation.


Next, with a blending brush, I dust a bit of black shadow in the crease of my eye. If you have a parallel crease like I do, you can do what I did and do the entire crease line. If you have a tapered crease, you can concentrate on the outer crease alone or bring the shadow across to the inner part of the lid above the crease line. 

Shu Uemura Pressed Eye Shadow in M Black 990. (Also a gift from my mom.)

The eyeshadow I've been using consistently for this look is the Shu Uemura Pressed Eye Shadow in M Black 990. Not too much though. Just a teeny bit of the eyeshadow on your blending  brush will go a long way. 

Learn more about my Hengfang Liquid Eyeliner in my previous post here. 

Next step is eyeliner. I use my Hengfang liquid liner for this look and keep it simple by just following the natural shape of my eye. No tricky flicks or fancy cat-eye liner for this look. The felt tipped applicator of my liquid liner provides me with a bit of a nice simple shape so I don't have to worry about getting the eyeliner even (thus saving me time).


Then I line my lower lashes with whatever black pencil liner I have on hand. I only line the lower lash line halfway and blend the end out with my finger just so that it doesn't look so harsh. 


After that I give my cheeks some color using my Nichido blush in Sun Kissed (Php88). The blush is great and really lives up to its name since it gives me just that right shade of pink. Like you've been in the sun just a little longer than you should have. Actually, think Evangeline Lilly from Lost.


A quick run through lashes with mascara, I use my Estee Lauder Mascara (which you can read more about here), is all you really need. If you want thicker lashes, of course you can keep building or use a more high impact mascara. 


Lastly, I'll go over my lips with a nice coating of lipstick. The lipstick that I use for this look (which is the focus of the look, really, and my favorite part of it) is a matte MAC lipstick in Snob. 

MAC Lipstick in Snob (Php999)
Now my love for this lipstick could give my MAC Ruby Woo lipstick a run for its money. Snob is definitely a well loved cosmetic in my makeup arsenal and I've already gone through two tubes of it since I noticed it in the stands (I've gone through four tubes of Ruby Woo to date). If you like pink lipsticks and haven't tried any from MAC yet, I highly recommend you try this one. 


And le voila! That is pretty much it. Definitely let me know if you decide to try this look out. I'd be interested to hear if it suited you. Remember, a look I post may not be for everybody. 

My camera problems still have not been solved (I really need to get a new one, any suggestions?), so I'm really sorry if the pictures aren't as great as they should be or if you can't see something clearly. 

Just remember that you can always leave me a comment or drop me an e-mail if you want a more detailed explanation or whatnot. Then again, it's a really simple, easy look to do (five to ten minutes, tops), so I'm hoping there aren't any problems. 

Ta-ta!


Monday, February 27, 2012

Work: Lookbook Shoot with Josh Orbeta

In the midst of the headlines made by the Oscars today (both on the red carpet and the actual ceremony), I received some exciting news. THE PREVIEW IS OUT!

"Hold up, the preview?" you may say. And I shall answer, "Yes, the preview. The preview to the finished results of a project that I hold very dear to my heart. I recently took part in a photo shoot for the lookbook of my friend, Josh (who I have mentioned quite a few times).

Josh taking a well deserved walk down the runway after successfully styling the Dita Sandico Ong segment for Ateneo Women's Week in 2011. 

The shoot showcased four garments that focused on the theme of turning garbage into fashion. All of the pieces in this (very)mini collection are made out of everyday household items such as garbage bags, hand towels, tea cozies and the like. 

Natasha Mendoza, 19, modeling one of my favorite pieces in the collection.
I've always been a big fan of Josh - his sketches and drive to pursue his dreams have definitely been a big inspiration to me - so I'm extremely honored and blessed to have been invited to be the makeup artist for this shoot. 


Now I can't post many photos (since I myself haven't been given access to many) or show you close ups of the faces just yet...


...but maybe one BTS shot won't hurt. 

Until the time comes that I can freely show photos and talk about the makeup for the shoot, you guys will just have to settle for the same thing I did: a cute preview video of what is to come. You're going to have to excuse the way I look in this video though (horrible!!). 

The entire shoot actually took place in my village and condo, so in between getting the necessary permission to take pictures in the common areas, making sure the team had enough space, fixing all of my makeup needs, and creating Josh's desired makeup looks for two models, I didn't exactly have any time to look, for lack of better term, good.


 So other than the fact that I look frazzled, have no makeup on, and am dressed ridiculously (I literally pulled the first things I saw out of the cabinet - and it shows), I absolutely adore the preview video. 

Thank you again to Josh for the invitation to take part in the shoot and thanks to the team for being so amazing and fun to hang out with. I'll put up info, links, photos on/of the people that took part in this shoot when the final video/photos are out. 

Saturday, February 25, 2012

Review: Marionnaud & E.L.F. Makeup Brushes

Remember those four makeup brushes I mentioned in my Watsons mini-haul entry?


Well, I've been a very busy girl running around town for different occasions.  For example, I've been cataloguing the different Spring 2012 collections already available in Manila (yes, I did get around to this kind of late, I know) and I even helped my good friend, Josh of Diary of a Wannabe, hunt down a Prada tote for a client. 

Hello! 
This was my go-to look this week. I might just do how-to post on this look, not quite sure yet. My apparently solved camera situation, was not really solved. 

 I needed something I could do in ten minutes or less (since I seemed to be running late all the time these past few days), a look that would minimize the products I took with me, but still gave me the "I know what I'm doing, I'm a professional" kind of vibe that could transition to makeup I would wear for a night out with the girls.

In any case, it gave me the perfect opportunity to test those makeup brushes over a reasonable amount of time. 

First up was E.L.F. Foundation Brush. 

 E.L.F. Foundation Brush (Php129.75) 
Now, I've made it quite clear that I don't care much for foundation, but I may just forget my disinclination to use foundation (oh, I rhymed) on occasion to use this brush.

At the first stroke, I thought I wasn't going to like the brush because it left a bit of a streaky finish with the foundation. In fact, when I first cleaned it, it bled a little and that had me worried too. But as I kept going, the streaks disappeared, the application evening out beautifully, and the foundation settled into my skin nicely. The bristles are lovely, soft and quite easy to clean with no more bleeding.

Testing the foundation brush. 
Another way to test the quality of a makeup brush is to hold it an angle, like you would a pen actually, and just press the brush down on the back of your hand. If it looks like a wider version of its original shape, that's a good indication that it's a good brush. As you can see, the E.L.F. foundation brushed passed the test. 

It doesn't quite beat a MAC 190 but with the extreme difference in price (MAC brushes can go from Php1,100 up to Php2,000), the E.L.F. foundation brush is just fine for me, thanks. 

Then there's the E.L.F. Powder Brush. 

E.L.F. Power Brush (Php249.75)
To be honest, I loved this brush from the first moment I ran my fingers through the bristles. By the time I'd given it a good testing, I absolutely adored it. It gets a good amount of product on its bristles and applies the powder lightly just so that you get enough of a matte finish on your face. If you like more powder, you can build on the first layer easy-peasy. 

My favorite thing about this brush is how soft it is. Honestly, I could just run that brush over my cheeks all day. It has a soothing quality that just makes me love putting my face powder on.

Testing the powder brush. 
The powder brush held its shape quite well when I tested it on my hand, so I'm extremely happy with that. I think I may just have my new favorite brush! 

The next thing I tested was the Marionnaud N32 Concealer Brush. 

Marionnaud N34 Concealer Brush (Php69.75)
 I normally use a dome brush or blending brush to blend my concealer in, but I thought I'd give this one a go when I saw how affordable it was. Now, a good concealer brush has relatively thin bristles otherwise it will leave streaks. A good concealer brush is also one that you find you can use with liquid, cream or powder.

When it came to this brush, I wasn't overly please nor was I disappointed with it. It picks up a ridiculous amount of product, especially when it comes to cream concealers, so be careful when you're dipping it into the pot. However, it didn't leave any streaks when I used it with liquid concealer, which was a redeeming quality. 

Testing the concealer brush

It held its shape well when I tested it on the back of my hand - another point in its favor. They say that a good test of a concealer brush is to use it with eyeshadow. If it's good to use for eyeshadow, then it's a pretty decent concealer brush. Admittedly, I haven't used this with my eyeshadow yet. When I do, I'll let you guys know. It may or may not get me more excited about this brush. Till then though, this brush is just average for me. 


 Last up, the E.L.F. Blending Brush.

E.L.F. Blending Brush (Php129.75)
Excitement was prevalent when I first saw this brush. Ever since I lost my MAC 217 (I'm still mourning it), I haven't quite been happy with any blending brushes I've tried. 

This one looked like it was a good quality brush and I had been pleased with E.L.F. brushes I'd bought in the past, so I nearly ran this to the check out counter. Unfortunately, this brush was a bit of a let down.
In terms of blending, the brush gets the job done, but you have to put up with a lot of shedding. 

Not sure if you can see the bristles on the paper towel, but they're there to the left of my finger. 
And I do mean A LOT of shedding. The brush shed when I cleaned it at first, it shed when I was blending eyeshadow on my lids (a strand actually got into my eye), it even shed when I was trying to smooth the bristles back into its original form after cleaning it. There was also a bit of bleeding when I cleaned it.

Testing the blending brush.
It held its shape well when I tested it, but what does shape matter at this point if the brush if going to be bald in a month? When it comes to this blending brush, I think you're much better off buying a MAC 217 because MAC brushes do last a very long time as long as you're taking care of it properly. I was trying to take care of this blending brush and it was shedding all over me!


Evidently, Macauley Culkin shares my sentiment.